Welcome, Marauders, to our November Health Patch! (NOW LIVE)

We have much to get through! In the notes below we have detailed all the fixes, additions, balancing, and more.

❗ Make sure to read through to the end, you don’t want to miss the sneak peek at what’s coming next!

FULL PATCH NOTES


NEW

  • Webley Pistol
  • EM-2 battle rifle
  • Locked Depot for the Navy Outpost
  • Locked Depot for Penal Colony
  • Sten attachments; Muzzle Brake, Drum Mag and Wooden Stock
  • Additional Daily Contract missions, bringing total to 42
  • Single loot spawners have had their physics disabled to prevent loot penetrating collision/spawning outside of the play area
  • Added map cycling to prevent too much map repetition
  • Players now receive a Marauder Kill for destroying a Breacher Pod
  • Intro movie can be disabled with Steam launch option command: ‘nostartupmovies’
  • Can now adjust FOV (80 to 100)
  • Can now have lean set to toggle
  • Air control – most weapons now have a larger spread and recoil whilst jumping. Some weapons have their spread only increased a little where it makes sense e.g. the viper mk1, shotguns and pistols.
  • Navy Commandos and their Major can spawn in any raid location except for the navy outpost.
  • Crews are automatically locked but you can set it to be unlocked via the creation of the crew.
  • A siren alarm can now be heard when a breach occurs inside a ship.
  • Reinforced Anti-Cheat

ART

  • Colour, reflections and lighting pass on Asteroid Mine.
  • Sten Weapon Model and Textures
  • Redistributed airlock positions in Asteroid Mine
  • Colour and reflections pass on Merchant ship
  • Stg44 rifle now has a front post (foresight)
  • Improved Krasa muzzle flash effects.

BALANCING

  • Capital Ship and Merchant Ship have had their spawn chance increased by 30%
  • The headshot damage multiplier is now 3x rather than 3.5x
  • Airlock redistribution in Asteroid Mine
  • 6 airlocks in Terraformer
  • 6 airlocks in Navy Outpost
  • 5 airlocks in Prison
  • 5 airlocks in Spaceport
  • The Airlock now has more accurate collision (props etc)
  • Sten suppressor now requires fabric alongside metal scrap
  • Sten suppressors does 2 extra damage instead of 1
  • Large first aid kit’s healing amount has been increased by 35%
  • Lower-tier recipes have had their crafting timers greatly reduced.
  • All armour and helmets (except the leather jerkin, civilian helmet and pouch rig) have been buffed by 20% protection.
  • Heavy caliber weapon damage has been increased by around 15%, except SVT40, Johnson and the Mosin pistol which have had their damage reduced.
  • “Top brass” mission requirements is now 8 instead of 10
  • “Become Infamous” mission has been re-balanced to include more targets.
  • M45-k is the only SMG to receive a damage buff.
  • Compact containers are now 3×3 cells.(storage capacity remains the same)
  • Industrial locked loot bins in Navy Outpost and Penal Colony
  • Klobb is now a burst only weapon and has a 24 round capacity
  • The jump turn rate is now 40% (down from 50%)
  • The durability of SMGs has been lowered
  • Most weapons have had their credit value increased by 15 to 35%
  • Welrod damage is down to 36 from 40.
  • All Smgs have had their recoil slightly increased.
  • Uzi suppressor now requires a toolkit instead of metal scrap
  • 9mm ammo and luger replaced with the Webley revolver in the pirate factions trader
  • Suppressors and stocks no longer available in the trader have been moved to crafting unlocks
  • EM-2 and Sten drum mag can now be looted from the Kingdom Alliance supply drop.
  • Radio backpack is now 6×6 storage capacity
  • Reduced recoil on the M50 rifle
  • Shotguns now have a large increase in spread over distance. the terminator and trench having a tighter spread, liberator and jackhammer have a medium spread and the double barrel has a larger spread
  • Reduced the length of certain actions on ai squads (sas and commandos) to prevent them looking frozen when failing to complete/reach them
  • Panzer removed from the central empire shop (now it’s higher tier armour) and replaced with plate armour. (medium tier armour)
  • Pirate trader’s supply drop has been added to the vault loot pool and removed from the faction shop, it has been replaced with the machete.

UI

  • The Discord button is now on the main menu screen
  • Removed ban appeal option from the main menu ticketing menu (moved to else where in the UI)
  • Changed the guide info to say you prestige at level 50 to match the actual in-game level you need to hit
  • Moved report button next to the player who killed you name in the end screen to make it more obvious
  • Added toggle lean to the options menu
  • In the main menu, can now use the ESC key to quickly close the following menus: leaderboard, support ticket, guide, ship management, daily contracts
  • Login screen and main menu you are banned now have buttons to appeal ban which goes to t17 support
  • Options menu tweaks and updated for new fov and toggle lean settings
  • A marauder-specific KD (aka KD against other players) to the stats menu
  • Build id is now shown on the login screen
  • Moved commando maj stat kills up next to the commando kills in the stats menu (as makes more sense)
  • New can’t enter raid area as pod warning popup if you try to use a raid entrance as a pod

ANIMATION

  • EM2 rigged in-engine and core animation set done
  • Webley rigged in-engine and core animation set done
  • Radar dish on top of the prison raid area now rotates slowly
  • Sten animation poses tweaks to go with new model

SOUND

  • New unlock sounds for the locked bar doors
  • Updated several sounds use in the large metal shutter door
  • Removed dead space from start of the pick up put down item sounds so they feel more responsive
  • Misc tweaks/adjustments to item pick up put down sounds
  • Tweaks/adjustments to misc attaching attachments to weapons sound in the workbench menu
  • Unique sounds added for k1 stock and mp40 stock being attached
  • New and reworked vault door sounds
  • New and updated lootable sounds
  • New sounds for the Webley (shoot & reloads)
  • Radar dish on top of the prison raid area now has sound

OPTIMISATIONS

  • Optimised Merchant Ship
  • Optimised Terraformer
  • Optimised Asteroid Mine
  • Optimised Ship Interiors

FIXES

  • Miscellaneous crashes
  • Various duplication issues
  • Various exploit issues
  • Various raid collision issues
  • Various Crew issues
  • Fix added to stop Auto looting/Fast looting removing attachments from weapons
  • Fixes added for instances of gear not coming into raid that was equipped in menu
  • Fixes added for Keycard’s losing dock information and player data.
  • Fixes added for members of a crew not going into raid with their captain/crew
  • Fixed transition sounds not playing when using the ESC button to quickly go back from certain menus
  • Fixed pressing escape on the main menu first time it would try and go back even though it was at the top-level menu already
  • Fixed vault locks back side being see through
  • Fixed some industrial bins being able to be accessed without being unlocked
  • Fix for crew still showing up in server list even if they were set to private (locked)
  • As pod the able to “breach” popup now contains the correct “key” based on your keybind settings
  • When on the turret the “key” to exit turret message now contains the correct key based on your keybind settings
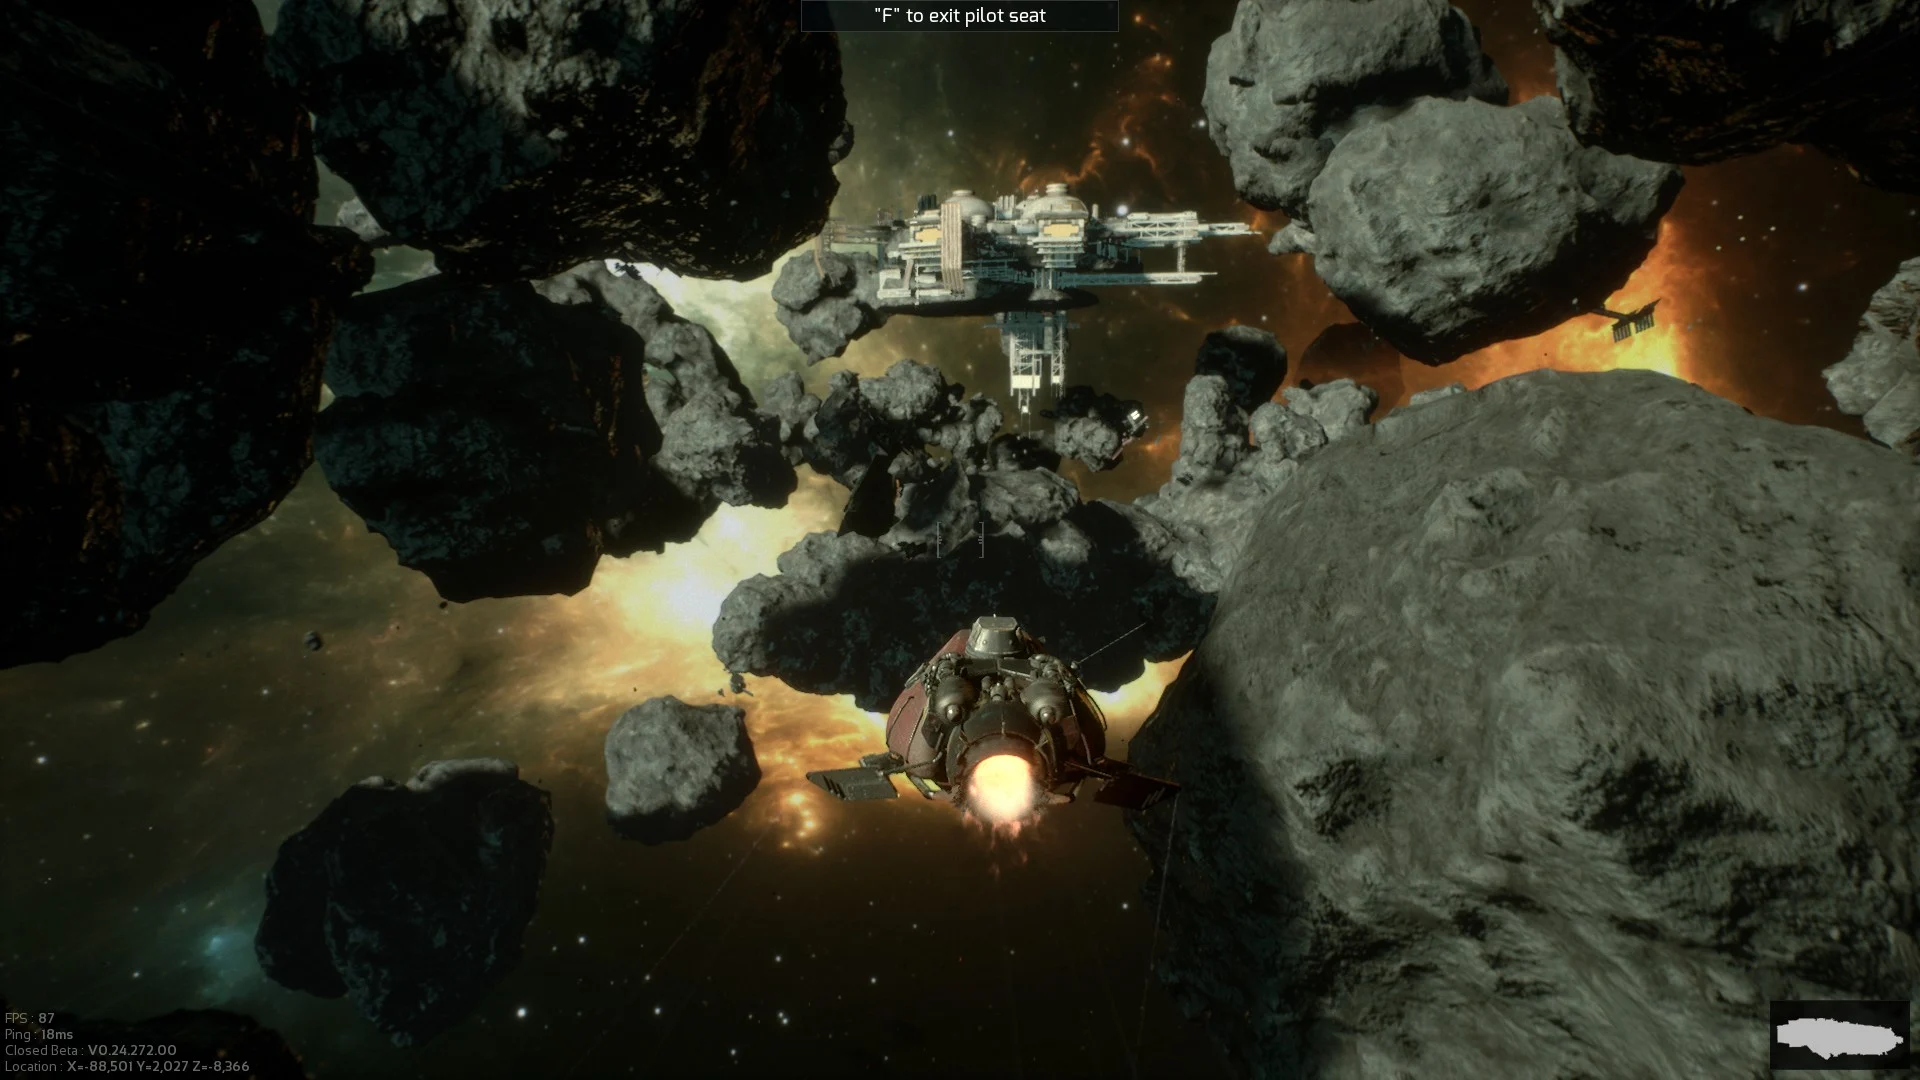
  • When piloting the frigate the “key” to exit the pilot seat message now contains the correct key based on your keybind settings
  • Fix for the fire extinguisher, blowtorch and flamethrower’s ammo is not shown in first person view/fpp
  • Fixes added to help with ultrawide problems
  • Fix added for splines causing a crash
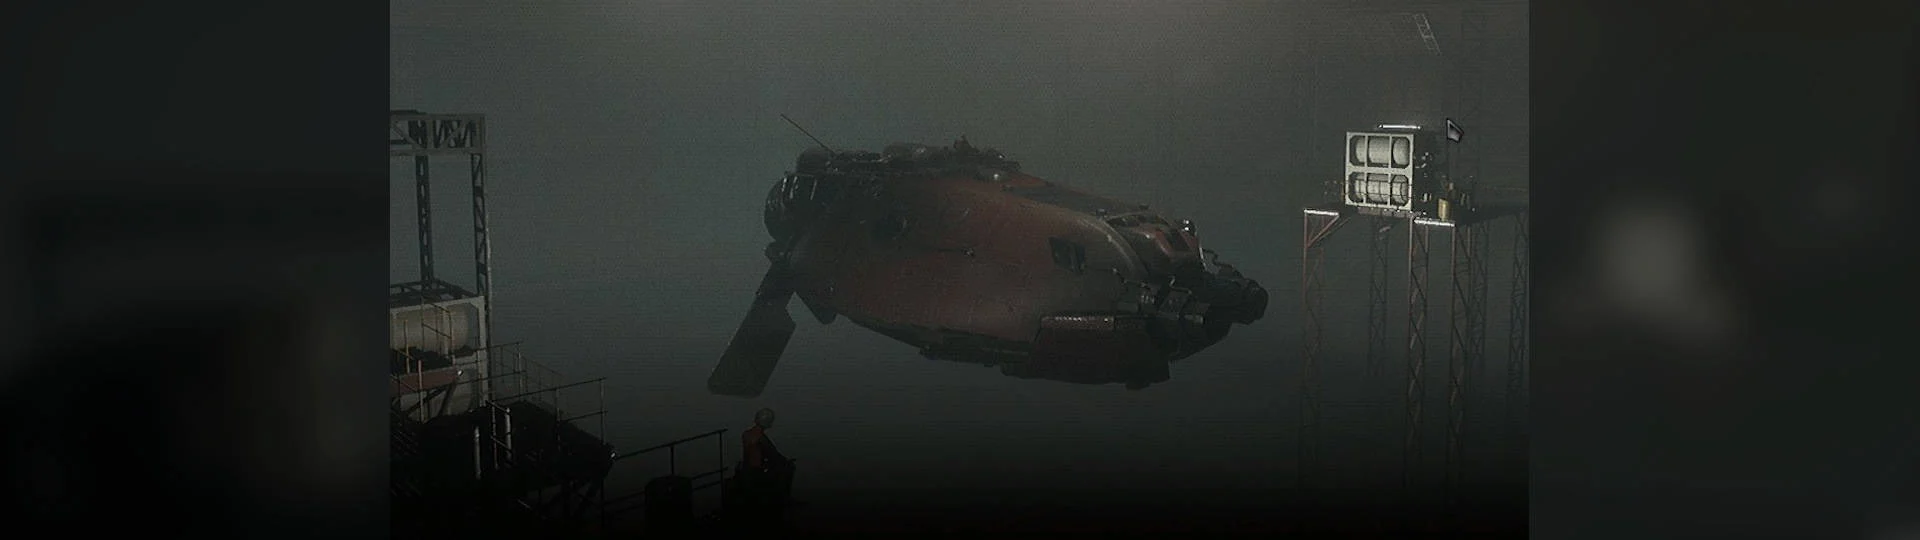
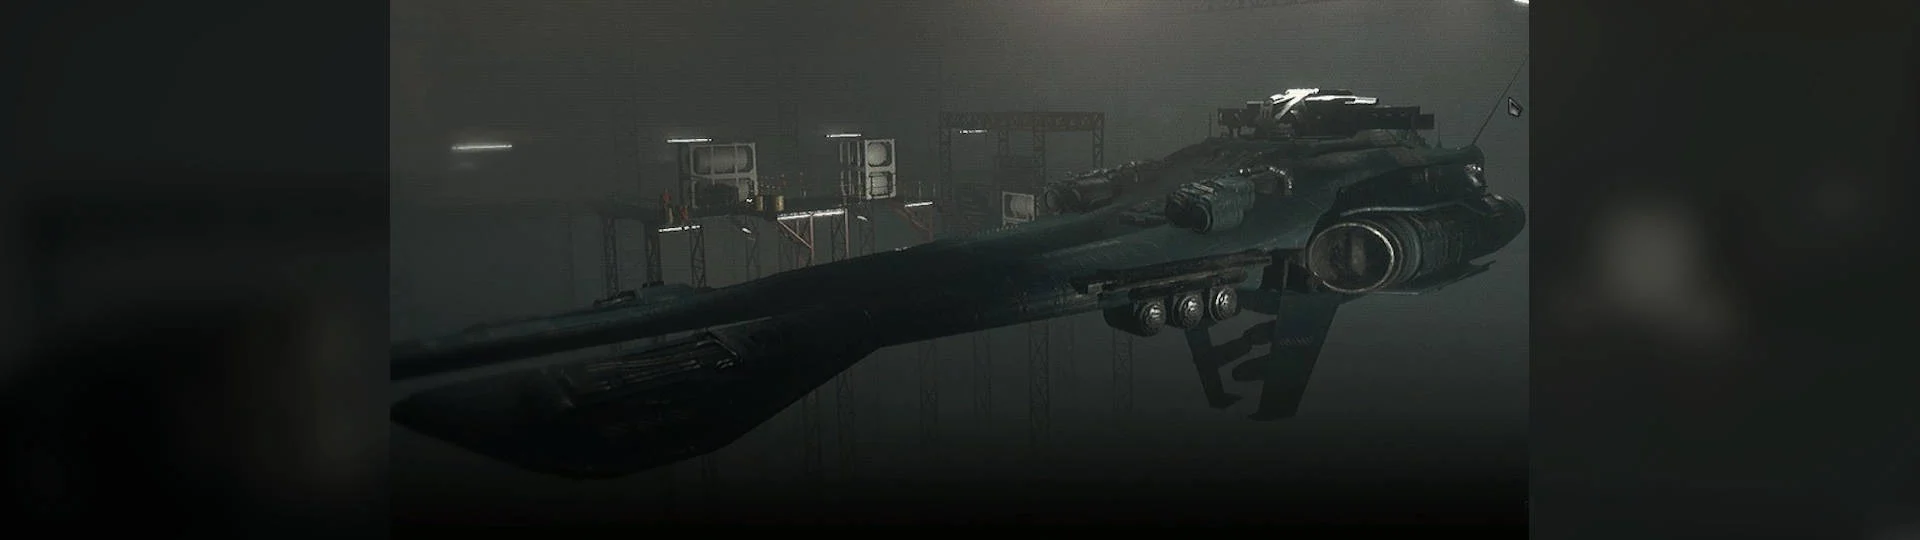
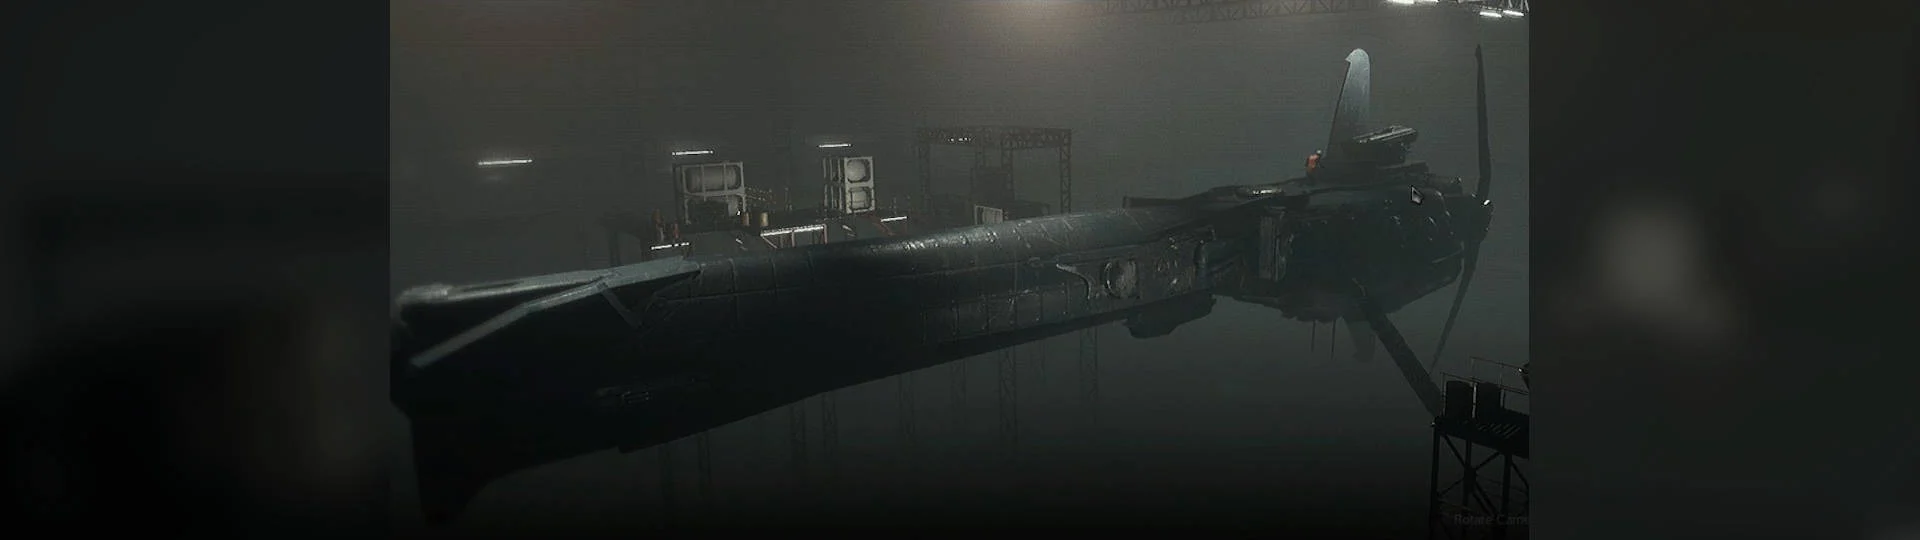
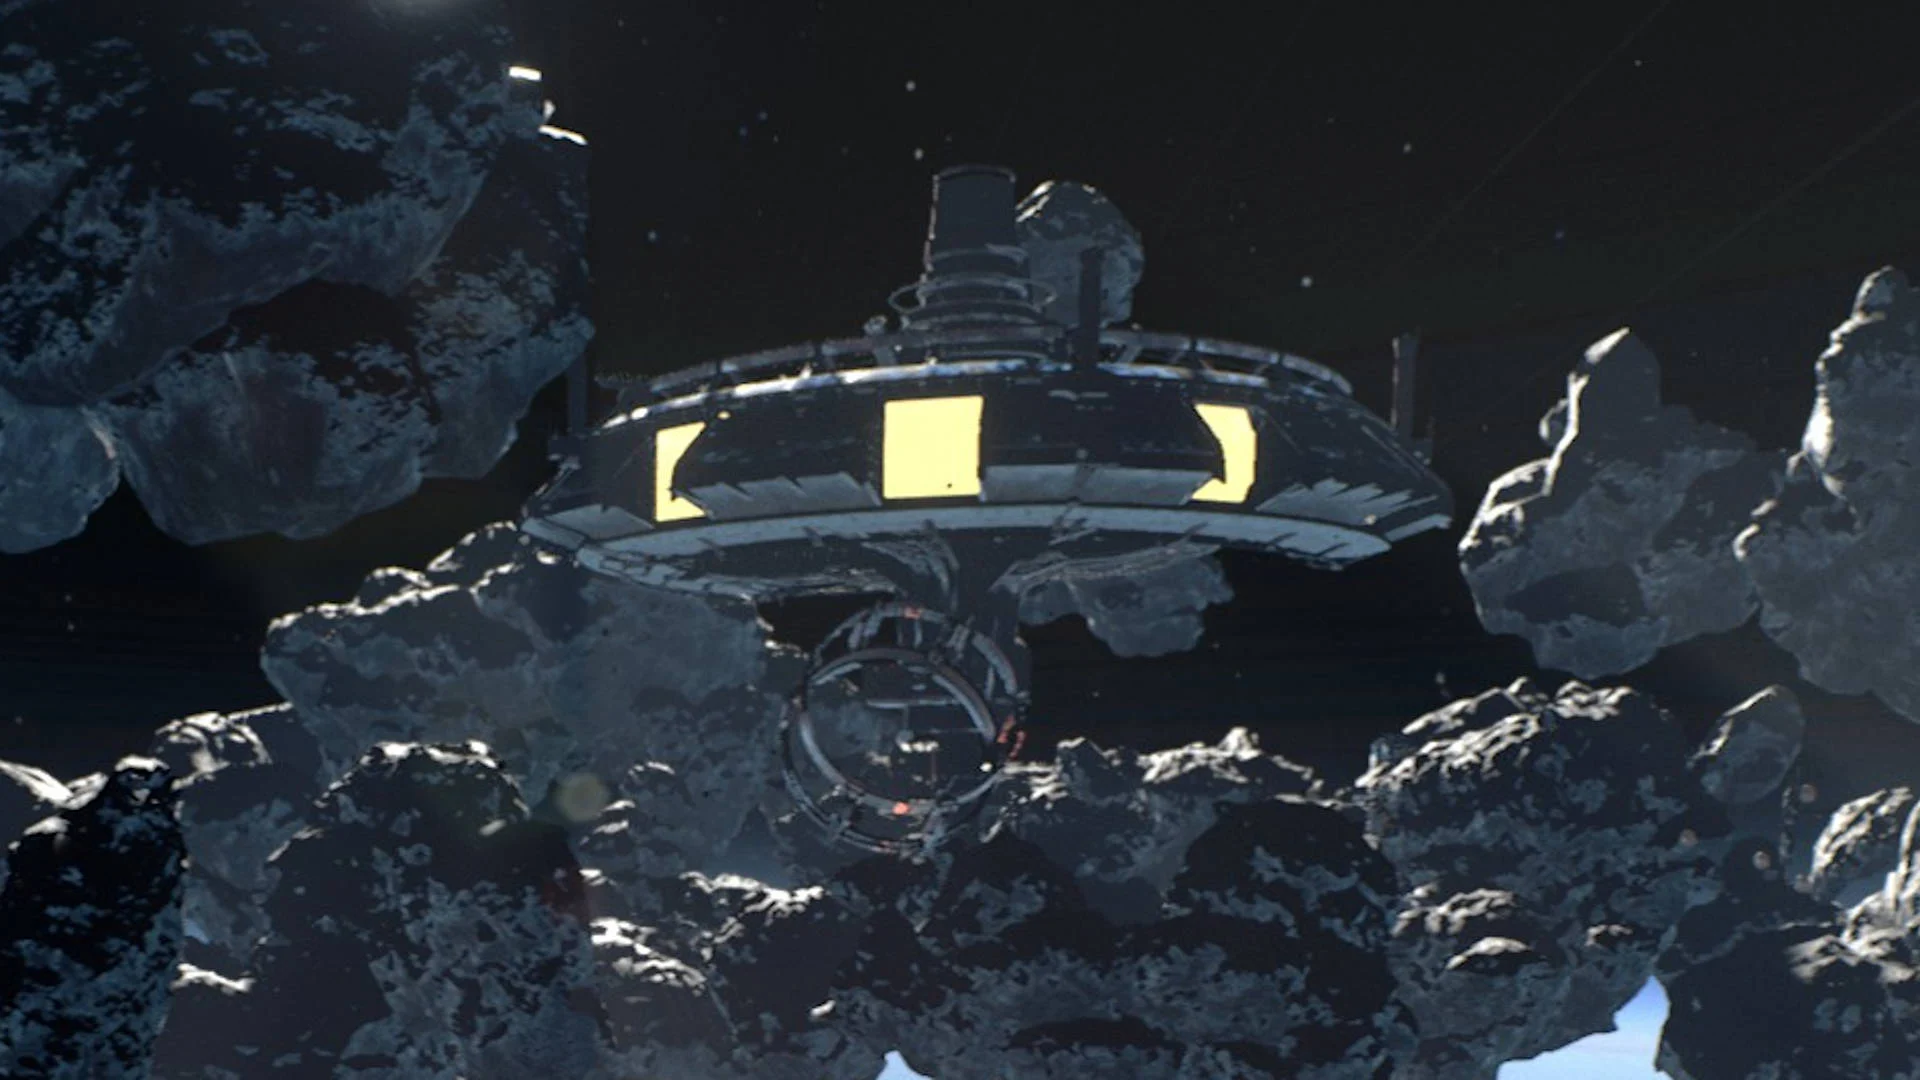
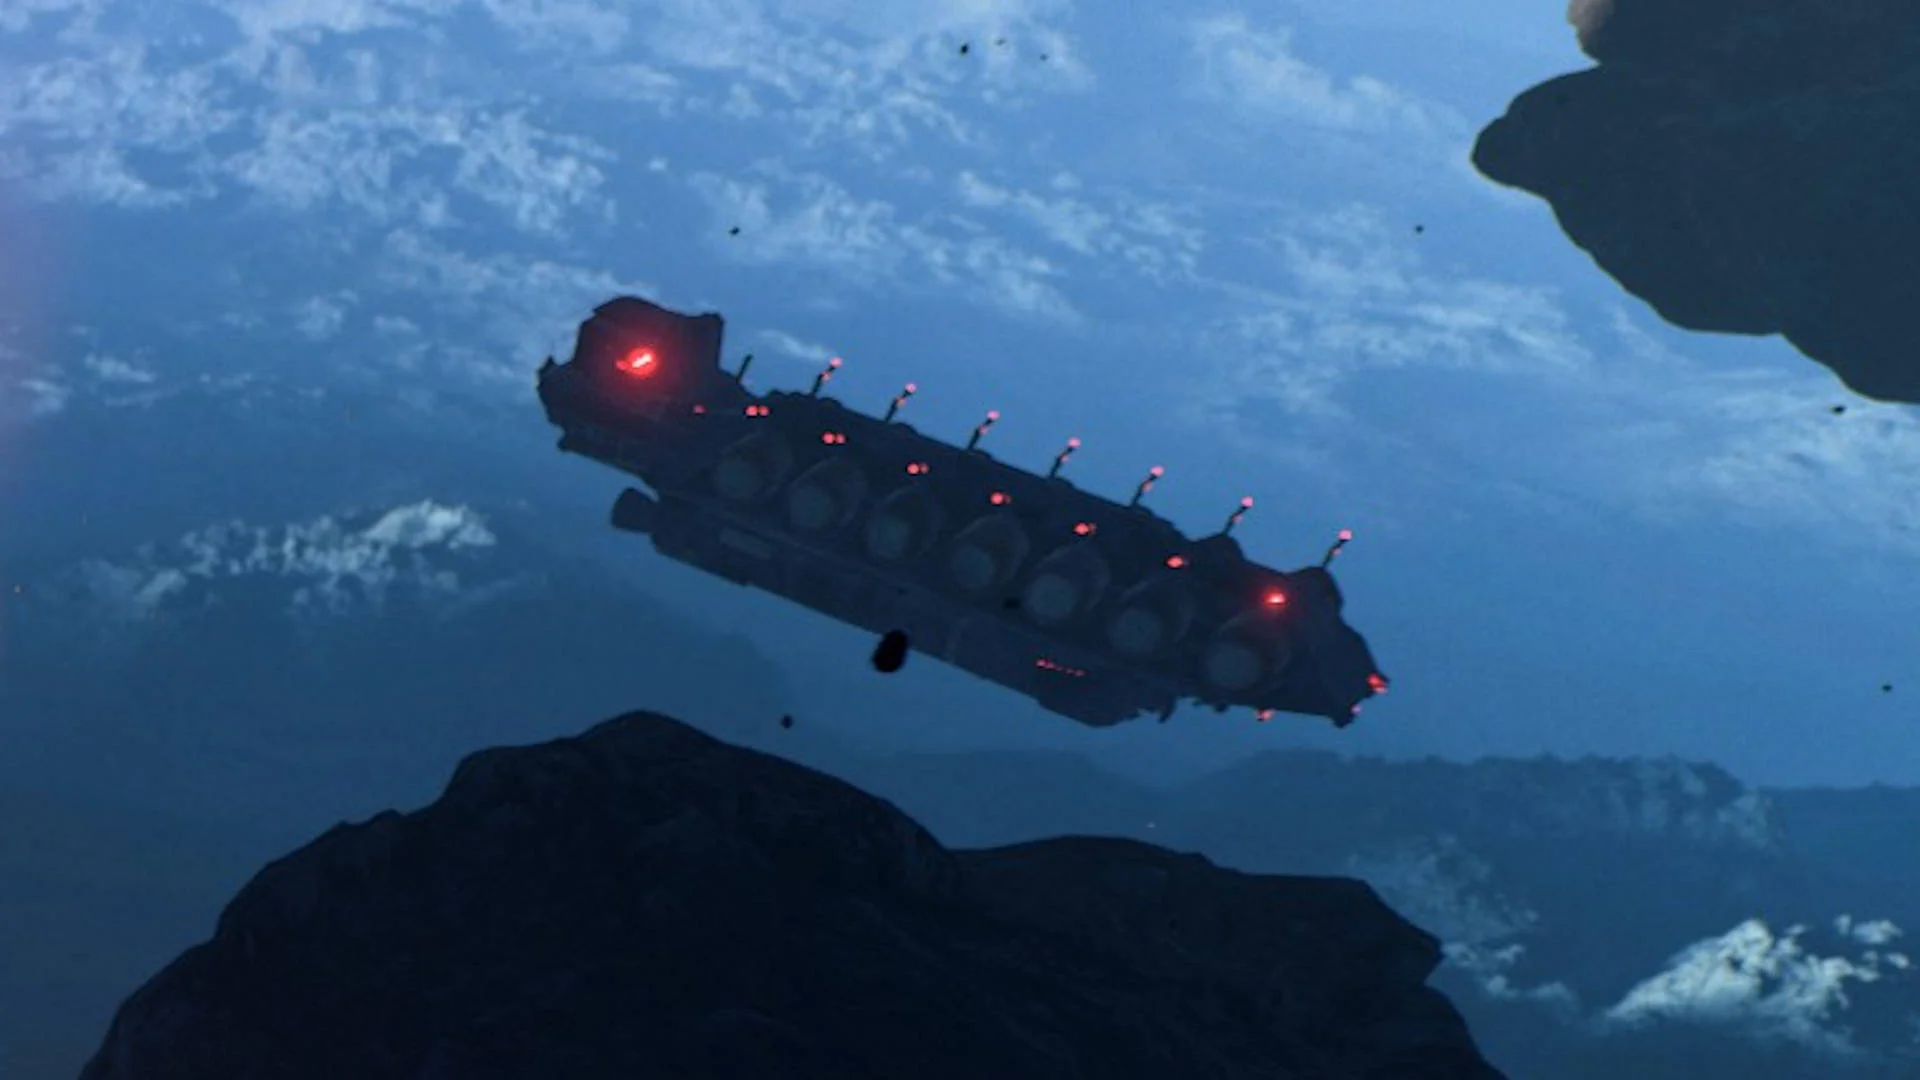
ONE MORE THING…

Our first, significant update is coming to Marauders this December – codename: Ace.

Cast your eyes on the transmission:

source: OFFICIAL MARAUDERS

Our Marauders Ships Guide will tell you how Ships work, how to repair your Ship, how you can give one of your Ships to a friend, and more!

If you need help, you can reach us on Discord Marauders Portugal

How Marauders Ships Work

Marauders Ships are used to get you from space into your Raid Location. Unlike many other Extraction Shooters, Marauders starts you outside of the area and requires you to enter it from the depths of space.

Ships can fly around within the limits of the area surrounding the Raid Location. All Ships are equipped with onboard weapons and Breaching Pods. Breaching Pods can be used to escape a heavily-damaged ship or to breach an opposing player’s Ship. You can even use a Breaching Pod to breach your own Ship and repair it.

The default “Rustbucket” ship is lacking in amenities, but higher-tier Ships can be outfitted with alternate weapons and other upgrades. Furthermore, the better ships have onboard inventories that allow you to store additional loot.

How to Repair Your Ship in Marauders

You can repair your Ship in Marauders by grabbing one of the many Fire Extinguishers located on the wall near the engine. These must be equipped in Weapon slots. A Fire Extinguisher can repair approximately 25% of a Rustbucket’s health.

If your Ship is damaged, any additional shots from an attacker will cause damage to the Crew within. You can repair a Ship even if it’s at 0% Health, but it’s difficult to do this as a solo player — you’ll be a sitting duck until you get moving again.

How to Steal a Ship in Marauders

There are two ways to steal a Ship in Marauders:

  • Use a Breaching Pod to board an enemy ship and kill the crew.
  • Kill the Captain of a Crew, steal their Captain’s Card, and exit the Raid via the Airlock their own ship is located at.

In either case, stealing a ship means you will have to abandon your own ship.

How to Sell a Ship in Marauders

You cannot sell a Ship in Marauders. However, you can scrap it in the Hangar and recover some of its cost.

How to Give a Ship to a Friend in Marauders

You can give a ship to a friend in Marauders by entering into a Raid, dropping them your Captain’s Card, and letting them exit the Raid. When they return home, they’ll find that the Ship is now in their Hangar.

List of Marauders Ships

Here is a list of all of the Marauders Ships we’ve encountered thus far and what we’ve learned about them.


Rustbucket

  • Crafting Cost – N/A
  • Inventory Size – N/A
  • Speed – 100
  • Turn Rate – 50
  • Armor – 150
  • Mobility – 200
  • Gun Damage – 70
  • Attachment Slots – N/A

“A [beat-up ship], you are [surprised] it even runs[.]”


The Rustbucket is the default Marauders Ship — you will always have one available. It comes equipped with four Fire Extinguishers, a Luger P08, 30 rounds of 9mm ammunition, and a Pouch Rig Armor; these items ensure that you can enter a Raid with basic equipment even if you’re broke. These items will respawn at the start of every new Raid.

If desired, you can enter a Raid, take all of the items, and immediately leave to scrap or sell them. You won’t get much in the way of useful materials, but it is a viable strategy to getting a little bit of money or materials if you’re truly out of money.

Marauders Ships Guide - Scout Frigate

Scout Frigate

  • Crafting Cost – 2 Metal Sheet, 1 Fuel Bottle, 1 Synthetic Scrap, 2 Cable
  • Inventory Size – 5 x 3
  • Speed – 200
  • Turn Rate – 50
  • Armor – 225
  • Mobility – 200
  • Gun Damage – 70
  • Attachment Slots – Weapon, Engine, Armour

“Gen 2 common spaceship, light class.”

The Scout Frigate is basically a Rustbucket that’s in good shape. It has an inventory unlike its cheaper counterpart.

Interceptor Frigate

  • Crafting Cost – 3 Metal Sheet, 3 Metal Scrap, 1 Tool Kit, 1 Fuel Bottle, 3 Synthetic Scrap, 1 Large Cable
  • Inventory Size – 6 x 3
  • Speed – 400
  • Turn Rate – 200
  • Armor – 250
  • Mobility – 300
  • Gun Damage – 70
  • Attachment Slots – 1 Weapon, 1 Engine

“A fast frigate. What it lacks in armour and slots it makes up for with its speed.”

The Interceptor Frigate’s main advantage is in its sheer speed — it moves four times faster than a Scout Frigate and it boasts a respectable inventory size, too.

Heavy Frigate

  • Crafting Cost – ?
  • Inventory Size – ?
  • Speed – ?
  • Turn Rate – ?
  • Armor – ?
  • Mobility – ?
  • Gun Damage – ?
  • Attachment Slots – ?

“A [heavily-armoured] frigate. What it lacks in speed it makes up for in thick armour plating.”

The Heavy Frigate is best described as a tank — it can absorb a lot more punishment than many other ships.

Vulture Frigate

  • Crafting Cost – ?
  • Inventory Size – ?
  • Speed – ?
  • Turn Rate – ?
  • Armor – ?
  • Mobility – ?
  • Gun Damage – ?
  • Attachment Slots – ?

“A rare and instantly recognisable from afar, the Vulture class is an interesting balance of speed and armour.”

The Vulture aims to balance speed and armor and can arguably do better than many of its cheaper counterparts.

Capital Frigate

  • Crafting Cost – ?
  • Inventory Size – ?
  • Speed – ?
  • Turn Rate – ?
  • Armor – ?
  • Mobility – ?
  • Gun Damage – ?
  • Attachment Slots – ?

“Pride and Joy of the Central Empire, the largest ship in the galaxy with two turret sections.”

The Capital Frigate is the absolute pinnacle of Marauders Ships and boasts the capability of equipping two different weapons. That said, do keep in mind that it’s a rather large ship — it will surely be an attractive target for boarding by other Marauders.

In this Marauders Weapons Guide, we’ll explain how weapons work in the game and break down the stats of all of the weapons we’ve found so far.

If you need some help, you can find us on Discord Marauders Portugal 

How Marauders Weapons Work

Most of the Marauders Weapons you find will be firearms, although there are a few melee weapons in the game as well.

Most weapons make use of these stats:
  • Ammo – The type of ammunition a Weapon uses.
  • Damage – How much damage a single shot does to an enemy.
  • Recoil – A measurement of recoil. A higher number means stronger recoil.
  • Capacity – How much ammo is in a magazine.
  • Fire Rate – A measurement of how quickly the Weapon fires.
  • ADS Speed – How long it takes to ADS (Aim Down Sights) with the Weapon.
  • Durability – A measurement of how much you can use the Weapon before it breaks. Broken Weapons must be repaired in the Gear menu back at home.
  • Attachments – What attachments are available for the Weapon, if any. Attachments can modify the stats of a Weapon. For example, a Stock will typically reduce the Recoil of a Weapon.

How to Get Weapons in Marauders

There are three ways to get Weapons:

  1. Buying them from Traders
  2. Crafting them (once you’ve unlocked the Crafting recipes)
  3. Looting them from containers, dead NPCs, or dead players

Where to Get Marauders Attachments

If you’re looking for gun attachments, there’s two ways you can obtain them:

  1. Purchase from Vendors (Rotating)
  2. Craft Them

List of Marauders Guns

Weapon Ammo Damage Recoil Ammo
Capacity
Fire Rate ADS Speed Durability Attachments
1911 Stamp .45 ACP 28 9 7 20 15 100 N/A
BAR .300 34 18 20 39 12 Muzzle, Magazine
Blowtorch N/A 10 5 500 80 15 250 N/A
Bren Mk2 7.62mm 32 16 36 54 18 100 N/A
Combat Knife N/A N/A N/A N/A N/A 35 N/A
De Lisle Carbine .45 ACP 28 54 11 12 20 100 N/A
DP 28 54 R mm 33 12 47 55 18 100 N/A
Fire Extinguisher N/A 5 1 75 50 20 50 N/A
Hunting Knife N/A N/A N/A N/A N/A 25 N/A
Krasa Rifle 7.62mm 28 7 20 65 22 100 N/A
Liberator 12 Gauge 85 14 4 14 18 100 N/A
Luger P08 9mm 24 8 8 25 20 100 N/A
M16 5.56mm 32 8 20 42 22 100 Magazine
M1941 Johnson .300 45 48 10 20 15 100 N/A
M1A1 Para .32 ACP 28 12 15 22 20 100 N/A
M45 “K” 9mm 21 6 36 45 18 75 N/A
M50 Reising .45 ACP 30 20 12 45 25 100 Muzzle, Magazine
MAC-10 .45 ACP 23 14 30 70 20 75 Muzzle
Machete N/A N/A N/A N/A N/A 75 N/A
Mat-49 .32 ACP 22 9 36 60 22 75 Magazine, Stock
Mauser M712 10mm 35 10 10 60 15 100 Magazine, Stock
MG-42 7.62mm 32 40 75 50 15 100 N/A
Mosin Obrez 54 R mm 55 64 5 3 15 50 N/A
MP40 10mm 24 8 30 45 21 75 Muzzle, Stock
PPSH-41 10mm 23 6 36 70 17 75 Magazine
Sawed Off 12 Gauge 84 36 2 10 18 40 N/A
Sten MKII 9mm 20 7 32 48 17 75 Muzzle
SVT-40 54 R mm 40 33 10 22 17 100 N/A
Terminator 12 Gauge 100 36 1 5 15 25 N/A
Thompson .45 ACP
Trench Gun 12 Gauge 60 26 5 10 18 50 N/A
Uzi 9mm 20 8 20 60 20 75 Muzzle, Magazine, Stock
ViperMK1 9mm 21 5 32 52 18 75 Muzzle
VZ-Klobb 9mm 20 8 20 60 20 75 Muzzle, Magazine, Stock
Welrod .32 ACP 40 18 6 5 18 50 N/A

credits Robert N. Adams

Our Marauders Crafting Guide will tell you how to craft items, how to unlock new items to craft, and what you get for scrapping existing items!

If you need some help, please Join our Discord Marauders Portugal

How Marauders Crafting Works

Marauders Crafting follows the fairly simple formula of “consume X items to craft Y object.” You’ll need to gather loot from the various Raid Locations and safely bring it back home in order to Craft these items. You can also gain Crafting materials by Scrapping items you purchase from Traders.

Unfortunately, you won’t be able to just Craft any old thing right away. You’ll have to unlock Crafting Recipes by leveling up, and a handful of Crafting Recipes won’t be unlocked until you complete certain Contracts.

The following is a list of the unlock costs for Marauders Crafting Recipes and the costs to Craft each item; we’ve also included a separate list detailing what you’ll get for Scrapping items.

List of Marauders Crafting Recipes

Item Level or
Contract Req.
Skill Point
Unlock Cost
$ Unlock Cost Crafting Recipe Crafting Time
(MM:SS)
Sack Bag 1 1 N/A 2 Junk Scrap, 1 Synthetic Scrap 0:15
StenMK2 Suppressor 1 3 $1,235 2 Metal Scrap 0:25
Small Shield Contract N/A N/A 1 Reinforced Metal, 3 Junk Scrap 0:30
Bowie Knife 1 1 $300 2 Junk Scrap, 2 Metal Scrap 0:20
Pirate Helmet 2 3 $1,900 4 Junk Scrap, 1 Synthetic Scrap 0:30
Bandage 2 1 N/A 1 Synthetic Scrap 0:15
Leather Jerkin 3 3 $2,155 2 Synthetic Scrap, 1 Leather Strips 0:30
Lockpick 3 1 $3,325 1 Metal Scrap 0:20
VZ-Klobb 4 2 $3,325 2 Junk Scrap, 1 Metal Scrap 0:30
9mm Ammo 4 2 $325 1 Gunpowder, 1 Metal Scrap 0:20
Uzi Suppressor 4 3 $4,625 1 Metal Sheet, 1 Synthetic Scrap 0:25
Light Bag 5 2 $5,250 2 Synthetic Scrap 0:15
Scout Frigate 5 1 $15,620 2 Metal Sheet, 1 Fuel Bottle, 1 Synthetic Scrap, 2 Cable 2:05
10mm Ammo 6 3 $6,635 1 Gunpowder, 1 Metal Scrap 0:20
12 Gauge 6 2 $16,775 1 Hi-Grade Gunpowder, 1 Metal Scrap 0:25
PPSH-41 7 4 $7,825 1 Metal Sheet, 2 Synthetic Scrap, 1 Gunpowder 0:45
Terminator 7 3 $16,825 1 Metal Sheet, 1 Hi-Grade Gunpowder 0:45
Torpedo Launcher 7 2 $27,700 1 Metal Sheet, 1 Synthetic Scrap, 2 Gunpowder 1:15
M1 Flak Rig 7 4 $12,815 3 Synthetic Scrap, 1 Metal Scrap, 1 Leather Strips 0:45
Small Container 8 6 $8,325 3 Synthetic Scrap, 2 Metal Scrap, 1 Tool Kit 1:00
PPSH Drum Mag 8 5 $8,525 1 Metal Sheet, 1 Metal Scrap 0:20
.45 ACP 9 3 $9,500 2 Gunpowder 0:20
1911 Stamp 10 3 $10,500 2 Metal Scrap, 1 Synthetic Scrap, 1 Gunpowder 0:30
M1 Helmet 10 4 $4,095 3 Metal Scrap, 1 Fabric 1:00
Small First Aid 10 5 $19,500 1 Synthetic Scrap, 1 Disinfectant 0:25
Mat-49 Stock 11 3 $11,555 2 Metal Scrap 0:25
.32 ACP 11 3 $11,635
Mat-49 11 5 $11,700 3 Metal Scrap, 1 Synthetic Scrap, 1 Gunpowder 0:45
Rocket Artillery 12 2 $32,075
Commando Backpack 13 3 $13,500 2 Fabric, 1 Metal Scrap, 1 Synthetic Scrap 1:00
5.56 Ammo 14 6 $14,800 1 Hi-Grade Gunpowder, 1 Metal Scrap 0:25
Interceptor Frigate 14 7 $52,500 3 Metal Sheet, 3 Metal Scrap, 1 Tool Kit, 1 Fuel Bottle, 3 Synthetic Scrap, 1 Large Cable 2:20
Hi-Grade Gunpowder 14 8 $37,075 3 Gunpowder, 1 Metal Sheet 0:45
Plate Rig 15 10 $35,075 1 Metal Sheet, 1 Fabric, 1 Leather Strips 1:00
Blow Torch Contract N/A N/A
54-R 15 5 $17,075
Flak Cannon 16 3 $62,055
7.62 Ammo Contract N/A N/A
Mosin Obrez 17 5 $17,500 2 Metal Scrap, 1 Synthetic Scrap, 1 Gunpowder 0:30
Heavy Frigate 18 8 $82,750
460mm Triple Turret 19 3 $109,115
.300 Magnum 20 7 $21,925
Machete Contract N/A N/A
SVT-40 21 6 $18,015
Large Container 22 10 $215,000
Howitzer Turret 24 4 $242,100
M16 24 6 $24,715
M16 Extended Mag 25 6 $25,715
BAR Compensator 29 7 $27,015
BAR Extended Mag 29 7 $29,715
BAR 29 7 $29,900
Nuclear Launcher 30 9 $309,000
M5 Helmet 31 8 $30,175
Capital Frigate Contract N/A N/A

List of Marauders Scrapping Payout Chances

Item Scrapping Item Chances
1911 70% Metal Scrap, 30% Junk Scrap
BA Beret 50% Synthetic Scrap, 50% Junk Scrap
BA Flak Vest 40% Fabric, 35% Metal Sheet, 25% Synthetic Scrap
BA Helmet 50% Metal Scrap, 30% Synthetic Scrap, 20% Junk Scrap
Barrel Backpack 50% Synthetic Scrap, 25% Metal Scrap, 25% Junk Scrap
Blow Torch 40% Metal Scrap, 35% Metal Sheet, 25% Junk Scrap
Bren Mk2 40% Metal Scrap, 40% Metal Sheet, 20% Junk Scrap
Civilian Helmet 50% Synthetic Scrap, 50% Junk Scrap
Cloth Cap 50% Synthetic Scrap, 50% Junk Scrap
Combat Knife 15% Synthetic Scrap, 15% Metal Scrap, 70% Junk Scrap
De Lisle Carbine 40% Metal Scrap, 35% Synthetic Scrap, 25% Junk Scrap
DP28 30% Metal Scrap, 25% Synthetic Scrap, 30% Metal Sheet, 15% Junk Scrap
Fire Extinguisher 15% Metal Scrap, 85% Junk Scrap
Heavy Stathelm 40% Metal Scrap, 40% Reinforced Metal, 20% Junk Scrap
Hunting Knife 15% Synthetic Scrap, 15% Metal Scrap, 70% Junk Scrap
Leather Cap 75% Leather Strips, 25% Junk Scrap
Liberator 25% Metal Scrap, 25% Synthetic Scrap, 25% Metal Sheet, 25% Junk Scrap
Light Bag 70% Synthetic Scrap, 30% Junk Scrap
Light Stathelm 30% Metal Sheet, 35% Metal Scrap, 30% Junk Scrap
Luger P08 20% Metal Scrap, 80% Junk Scrap
M1 Flak Vest 75% Synthetic Scrap, 25% Junk Scrap
M16 35% Metal Scrap, 35% Synthetic Scrap, 30% Junk Scrap
M1A1 Para 50% Metal Scrap, 50% Synthetic Scrap
M1941 Johnson 35% Metal Sheet, 30% Synthetic Scrap, 35% Junk Scrap
M3 Flak Vest 30% Metal Scrap, 30% Synthetic Scrap, 30% Metal Sheet, 10% Junk Scrap
M50 Reising 40% Metal Scrap, 35% Synthetic Scrap, 25% Junk Scrap
Mat-49 75% Metal Scrap, 25% Junk Scrap
Mauser M712 50% Metal Scrap, 50% Junk Scrap
Plate Rig 35% Metal Scrap, 35% Synthetic Scrap, 30% Junk Scrap
Pouch Rig 70% Synthetic Scrap, 30% Junk Scrap
PPSH-41 30% Metal Scrap, 35% Synthetic Scrap, 35% Junk Scrap
Riot Helmet 30% Metal Scrap, 25% Synthetic Scrap, 30% Metal Sheet, 15% Junk Scrap
Sack Bag 50% Synthetic Scrap, 50% Junk Scrap
Security Helmet 50% Metal Scrap, 30% Synthetic Scrap, 20% Junk Scrap
Small Shield 30% Metal Scrap, 35% Metal Sheet, 35% Junk Scrap
Sten MKII 60% Metal Scrap, 40% Junk Scrap
Uzi 50% Metal Scrap, 50% Junk Scrap
Welrod 50% Metal Scrap, 50% Junk Scrap

Thanks for reading our Marauders Crafting Guide. If you found it useful, why not have a look at some of his content

This Marauders Locations Guide will show you what each Raid location looks like and gives you tips about what you can expect to find within.

If you need some help, check our Discord Oficial Marauders Portugal Click here 

List of Marauders Locations

This is a list of all of the Marauders Locations we’ve found in the game thus far along with some information about each of them.


Iridium Asteroid Mine

The Iridium Asteroid Mine is overrun with Raiders. It features many large, open spaces where you will be very exposed. Move through the map carefully — walking down the wrong hallway could put you in a position where you’re under attack and you have no cover.

Here are the key locations in the Iridium Asteroid Mine, complete with relevant Contract objectives and general coordinates:

Asteroid Half Track Bike – part of the Zero to Hero ‘Repo Man’ Core Contract.

  • X = 62,283
  • Y = -4,086
  • Z = 74

Security Office – Good loot location, including an armoury requiring a lockpick, and a Transmitter near the entrance.

  • X = 59,000
  • Y = -5,400
  • Z = 497

Air Production/Air Processor – Involved in the Air Production Daily Contract.

  • X = 66,000
  • Y = -1,050
  • Z = 499

Furnace – Involved in the ‘Scouting Party’ Zero to Hero Core Contract.

  • X = 64,000
  • Y = -2,000
  • Z = -29

Mine Depot – High-quality loot location within the Furnace Room that can contain rare Crafting resources, including Nuclear Material.

  • X = 62,500
  • Y = -400
  • Z = 362

Foreman’s Office – The Foreman’s Gold Ring for the Brigand Service Daily Contract can be found here, as well as various medical supplies, alongside a Transmitter.

  • X = 67,000
  • Y = -5,550
  • Z = -910

Mine Tunnels – The Asteroid Nickel Ore for the Mineral Mania Daily Contract can be found here alongside other high-quality loot.

  • X = 65,700
  • Y = -5,120
  • Z = -1,494

Iridium Asteroid Mine Vault – Contains high-quality loot but requires a Blowtorch to enter.

  • X = 63,500
  • Y = -3,000
  • Z = -791

1st Locked Yellow Container – High-quality loot location.

  • X = 61,000
  • Y = -5,660
  • Z = 498

2nd Locked Yellow Container – High-quality loot location.

  • X = 65,400
  • Y = -3,600
  • Z = 297


L1812 Service Space Station

The L1812 Service Space Station has devolved into chaos and has been virtually abandoned. It contains a mix of medium-sized rooms and smaller hallways.

Here are the key locations in the L1812 Service Station/Spaceport, complete with relevant Contract objectives and general coordinates:

Cargo Room – The Spaceport Cargo Report for the Shopping Tour Daily Contract can be found here in the upper room.

  • X = 66,570
  • Y = 19,003
  • Z = 397

The Bar – The Admin Manifest for the Papers Please Daily Contract can be found here, as well as a Transmitter. There is also an Armoury on the ground-floor around the central bar area which stores high-quality loot, and a Medical Room upstairs.

  • X = 59,000
  • Y = 24,000
  • Z = 299

Spaceport Vault – Found at the back of the Bar area, the Vault contains high-quality loot but requires a Blowtorch to enter. This location is also relevant for the Vault Intel Daily Contract.

  • X = 68,000
  • Y = 23,000
  • Z = 100

Heavy Frigate – A Motor Oil Can for the Fuel Shortage Daily Contract can be found on the floor here.

  • X = 55,000
  • Y = 23,000
  • Z = 400

Meat Locker – A helpful landmark to orient yourself during Raids, located near the Bar. This area is often quiet and has quite a few containers to loot.

  • X = 60,500
  • Y = 17,200
  • Z = 200

Customs Rare Loot Room – Found between the Bar and the Meat Locker, this small room in the Customs area houses high-quality loot drops, including weapons, armour, and Crafting materials.

  • X = 59,500
  • Y = 25,000
  • Z = 52

Spaceport Depot – High-quality loot location that can contain rare Crafting resources.

  • X = 69,500
  • Y = 20,000
  • Z = 204

1st Locked Yellow Container – High-quality loot location.

  • X = 64,500
  • Y = 25,500
  • Z = 100

2nd Locked Yellow Container – High-quality loot location (underneath the Heavy Frigate).

  • X = 68,000
  • Y = 23,000
  • Z = 100


As one might expect, you’re going to find tougher-than-usual NPCs in this location. SAS Operatives (and the superior SAS Captains) roam the halls and many of them are equipped with the Bren Mk2 machine gun. Confront the enemies here with caution.

Here are the key locations in the Navy Outpost, complete with relevant Contract objectives and general coordinates:

Barracks – This dense area is the sleeping quarters for the soldiers on board. There are several lockers populating this area that have a chance to contain high-quality loot.

  • X = 24,000
  • Y = 47,000
  • Z = 650

High Command – High-quality loot location. This overlooks the two main hangars, giving you a great vantage point against other players and AI enemies. High Command contains several weapon crates, SAS enemies carrying strong equipment, and can even spawn Supply Drops.

  • X = 20,000
  • Y = 38,500
  • Z = 1,250

War Room – Tucked away down corridors is this high-quality loot location, which can contain War Bonds among other valuable loot in containers.

  • X = 25,500
  • Y = 41,500
  • Z = 1,000

Infirmary – This medical bay on the lower decks contains lots of healing supplies, including a Medical Bag container that can drop rare healing items such as First Aid Kits and Syringes.

  • X = 23,000
  • Y = 43,000
  • Z = 451

Navy Outpost Vault – Located in the main hangar area, the Vault contains high-quality loot but requires a Blowtorch to enter.

  • X = 25,000
  • Y = 37,000
  • Z = 454


Penal Colony Beta 5

Penal Colony Beta 5 is simply out of control. Prisoners roam the corridors freely and many of them have gotten their hands on equipment from long dead security officers. Many of the Prisoners are only armed with a knife. Don’t let them get too close — you can be killed with a single melee hit.

The outer hull is protected by four turrets sitting atop the station. Destroy them with your ship’s gun from a safe distance before approaching.

Here are the key locations in the Penal Colony, complete with relevant Contract objectives and general coordinates:

Central Tower – At the centre of the map, this tower grants easy access to each of the three floors and is a great landmark to orient yourself while exploring Penal Colony.

  • X = 60,000
  • Y = 68,000
  • Z = 679 (ground floor)

Security #1 – A small control room location containing basic loot, including Silver Coins, which serves as a good landmark to orient yourself.

  • X = 55,000
  • Y = 71,500
  • Z = 1,149

Locked Door #1: Maintenance – Near Security, the Maintenance tunnel has an area behind a locked door. Inside can be high-quality loot, including War Bonds.

  • X = 55,000
  • Y = 67,500
  • Z = 750

Locked Door #2 – Between Security and Gym, this locked area contains high-quality loot, including War Bonds.

  • X = 57,800
  • Y = 72,000
  • Z = 600

Security #2 – Another control room type area can be found near Kitchen. Inside can be War Bonds among other loot.

  • X = 66,000
  • Y = 72,000
  • Z = 700

Locked Door #3: Maintenance – Another Maintenance tunnel can be found near Security #2 and the Workshop. In the tunnel will be the third locked area, requiring a lockpick to access the high-quality loot, including War Bonds.

  • X = 66,000
  • Y = 68,000
  • Z = 295

Penal Colony Vault – Housed on the third floor within the Staff Locker area, the Vault contains high-quality loot but requires a Blowtorch to enter.

  • X = 58,000
  • Y = 62,500
  • Z = 1,601


Terraformer

As with the Iridium Asteroid Mine, the Terraformer has a lot of wide-open areas devoid of cover. Try to conserve stamina and be prepared to sprint to safety if you’re in one of these open spaces.

Here are the key locations in the Terraformer, complete with relevant Contract objectives and general coordinates:

Quarters – Near the Research spawn area, the Quarters is a small concrete building that can contain handy medical supplies.

  • X = 54,000
  • Y = -41,000
  • Z = 350

Production – A large concrete building marked with distinctive red paint, Production houses the Production Manifest required for the Crop Production Daily Contract.

  • X = 52,500
  • Y = -44,000
  • Z = 250

Terraformer Depot – Inside the tunnel system is Terraformer’s Depot. This contains high-quality loot, including rare crafting materials.

  • X = 60,000
  • Y = -35,000
  • Z = 206

Locked Door #1: Terraformer A – Inside the large Terraformer A tunnel is an area behind a locked door. Inside can be high-quality loot, including medical supplies.

  • X = 53,000
  • Y = -36,000
  • Z = 350

Locked Door #2: Tunnel B – Further inside the tunnel system, in the Tunnel B zone, is another locked door containing high-quality loot, including valuable War Bonds.

  • X = 61,000
  • Y = -29,000
  • Z = 350

Terraformer Vault – In the central area of the map, near the Research Tunnel, is the Vault, housed within a large concrete building with identifiable yellow markings. The Vault is at the back up the stairs. This area contains high-quality loot but requires a Blowtorch to enter.

  • X = 48,000
  • Y = -32,500
  • Z = 639

1st Locked Yellow Container – High-quality loot location directly outside the Vault building.

  • X = 49,000
  • Y = -31,000
  • Z = 100

2nd Locked Yellow Container – High-quality loot location on the opposite side of the central area from the Vault and the first yellow container.

  • X = 54,000
  • Y = -25,000
  • Z = 100


Merchant Ship

The Merchant Ship is different from standard Marauders Locations. It doesn’t have a dedicated map of its own; rather, the ship can randomly appear in Raids on other locations. You can only board the Merchant Ship by abandoning your ship with a Breaching Pod and using it to breach the Merchant Ship.

This ship is protected by Security Personnel who are armed with PPSH-41s and 1911 Stamps. Unfortunately, several of the Escape Pod/Breaching Pod locations are located right next to each other on the lower deck, so watch out for other players when you’re breaching or escaping the Merchant Ship.

Damaged Capital Ship

Like the Merchant Ship, the Damaged Capital Ship has a random chance to spawn at the start of each Raid you enter and you can only get aboard it by launching a Breaching Pod from your ship. However, it is a much rarer spawn than the Merchant Ship.

Beware approaching the Capital Ship since, although its severely damaged, the heavy Flak Cannon on the top is still very much active. Destroy this cannon from a distance using your ship before approaching and attempting to breach.

The challenge doesn’t end once you board the vessel. The Damaged Capital Ship is a very enclosed and claustrophobic environment, predominantly being tight corridors with several small rooms on either side, giving plenty of opportunity for ambushes. Moreover, the ship is inhabited by the toughest and most deadly NPCs in the game, elite Navy soldiers like the Commando and Captain units, often coming equipped with full Panzer Rigs and assault rifles like the Krasa Rifle. If you manage to take one down, however, you can loot the very same items from their bodies. This makes the Damaged Capital Ship the best place to go for the most powerful Weapons and Armor you can find. Once again, don’t attempt to enter this location lightly or you will pay the price.

Hello followers of GamingArmyUnited, we want to let you know the first MARAUDERS DISCORD IN PORTUGAL, they are looking for adventurers who want to share unique moments with the most varied types of Portuguese players with the goal of creating a “Friendly” community, so that everyone can play in a serene, friendly and very fun environment.

POWERED BY [GAU] GamingArmyUnited